donderdag 31 januari 2013

Eco modding

Eco Modding,


Cars are like bricks which we drag at high speed through the air, petrol must be very cheap for us to waste it like this.

In Mostly The United States, people are experimenting with streamlining their cars, some modifications are very rough while others seem pretty good.
I know that this is not allowed in many other countries (including my own ;-((( ) by the authorities, they use safety as an excuse to protect the large car companies.

The Areo civic:

95mpg at 65mph ( 2.475 L/100km, 40.3 km/l; at 105km/h) amazing figures.
Streamlined rear-end wher much of the resistance is generated, also the underside was covered with smooth plating, wheel covers. The rest of the aerodynamic modding was limited.


The Avion 100mpg plus
100mpg (2.35l/100km, 43km/l)
Totally re-energineered "slippery" car


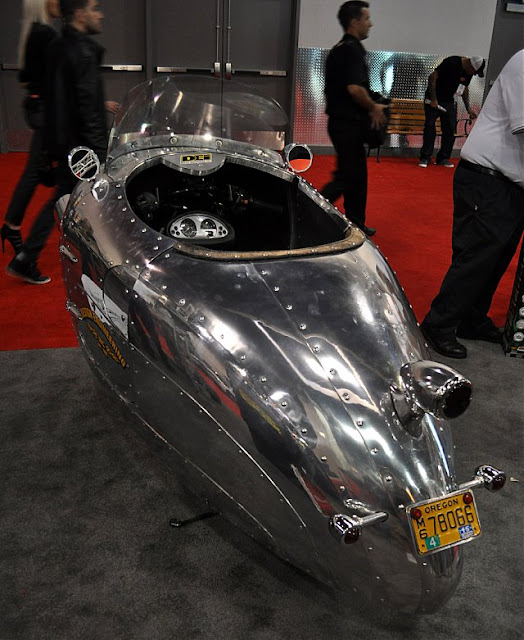
 The Dolphin by Dave Cloud,

?? 214mpg; 1.991 L/100km; 91 km/L
For me the best example of what can be done when you throw all conventions into the wind.
It is old news and finding a good website with details is impossible, but on ECOMODDER.COM there still is a lot of information about this car.
A lot of pictures are available on this picassweb link.
And on this picasaweb album about measurements of the dolphin for a new car/trike.






woensdag 30 januari 2013

Decopod

Decopod,


Once more the evidence that everything is possible!
Look at this!

Randy Grubb, a gifted craftsman has made a beautiful pod for his moped.
His youtube movie is worth looking as as you also see him explaining and driving the deopod.
Another little movie shows that it is very drivable


Aerotail 10% more mpg

Aerotail 10% more mpg


Found this "selfbuilt" interesting extra luggage space based on a car bicycle rack,
gives 10% better mpg!!

Lets alle make one! Aerotail


dinsdag 29 januari 2013

Single Sided Hub center steering

Single Sided Hub center steering,

for the streamlined electric motorcycle.

As a design excercise I have been looking at a single sided version of the hub center steering. It took me quite some hours to figure it out, make the design and do the renderings, but it is done!

There is a  youtube movie of the design,
a take apart animation so you can see how I solved the problem.
It is now possible to easily take off the front wheel, the double roller bearing is much smaller and consequently lighter than the two sided design.
There is more rotational space on the left side of the hub as the brake disk could me moved more inward.

Below some images to peek your interest.


1950's sailing hydrofoil Monitor

Monitor

Baker MFG. Co.

One of the earlier succesfull sailing hydrofoils was Monitor built bij Baker mfg. co.
Imagine in the 1950's what exhiliration this must have given.
Some very interesting webpages on Monitor are found on the website wind-water.nl

The ladder type hydrofoil has inherent stability as the lift decrease with ride height. But they had e cleverly designed mechanical computer which used input forces from the stay's to control the angle of the rear foils.
Sailing speeds in excess of 30 knots were reached which is amazing for the fifties, as it took other craft more than 30 years to once more reach those speeds.

When you are still interested have a browse arond the Monitor pages of wind-water.nl


The wingmasted version is a rendering of the originally intended  boat, for which they had too little funds! That would have been a true revolution!
The times when we stil believed anything was possible.


maandag 28 januari 2013

DN ice yachting

DN ice yachting


Winter in the northern Hemisphere, so Ice sailing!


The DN class is within reach of anyone . Easy to build, designed to be homebuilt.
 Lots of information on the internet how to build them.

International DN Organization.

All the DN class plans.
An example below

Example website 

Website of how to build one


zondag 27 januari 2013

Thrust Cycle

Thrust Cycle

gyro stabilized vehicle

There is another company working on a gyro stabilized motorcycle.
Thrust Cycle is generating much less publicity then Lit motors, but they also have a working prototype and that for quite some time already, as you can see from their youtube movie.


They are now working on a nice looking aerodynamic shape, for which they cleaverly have used the services of a sculptor. Pictures from the basic shape produced by an interesting company (The Car Factory) can be seen on this website.


zaterdag 26 januari 2013

Gyro stabilized monorail

Louis Brennan

gyro monorail

Interesting history of the gyro monorail to be found on Wikipedia
The small Louis Brennan Wiki page here.


His invention was a mechanically controlled set of gyro's that could keep up a 20 ton railwaycar running on a single track.
The mechanically interconnected counter rotating gyro's were forced to rotate so that the combined precessing force would righten the monorail. The Patent can be found on the gyros.biz website
A first glimpse of how it works is the below drawing.


Peter Healy made a Brennan style stabilization which is very stable Youtube
Note that therotational axes of the gyro's are horizontal (as with Brennan) contrary to almost all other examples on the internet including Lit.

That the Brennan inventions works quite well can be seen from the pictures of children in the model car. The one with the boy showing the transition from the rail to the steel cable and the girl seems suspended in mid air.


The last reference (for now) is Dave Woolard who had some very interesting gyrobike simulations on the internet. I cannot find him anymore .... But I copied one of his prictures, lets hope his simulations come online again some time.


vrijdag 25 januari 2013

Lit motors

Lit motors

Rekindle the exitement

Jealous, that's what I am when I see the progress of LIT motors.
How does Daniel Kim do it, how does he fund his team ....


Ok enough of this.
Their mock-up is phantastic.
There are several video's online and their website has some also.
This youtube movie can be a good starting point for you.


What is their basic idea? 
They want a monotracer design (ie. motorcycle, vehicle riding along a single track) but without training wheels / landing gear to keep the vehicle upright when driving at low speed. (they have a parking stand)
Their solution is using twin gyro's for stabilization. The precession of the gyro's is controlled in such a way that the vehicle will always stay upright.
Looking at the video's it becomes obvious that there are some issues with the gyro control, too many people around the vehicle, a wobbly motion when standing still, video's cut short suddenly.  Hope they wil soon solve this.

Streamlined shape.
The shape of the vehicle obviously will have to be re-designed as the side windows are not high enough for comfortable view even when small persons are sitting inside.


Battery capacity.
The gyro's  take up a lot of room below the seat(s) and that leaves little room for batteries for the electric motor. From my own designs (for sem) I know that the drive batteries are the major problem, if you want performance in power and endurance you need a large number of relatively high capacity batteries, which take up a large volume ....
In the Lit design I do not see where they intend to store the batteries.


Just some more Lit eye-candy.
Keep up the good work Daniel Kim!


donderdag 24 januari 2013

Threaded Bolt in Rhino3D

Threaded Bolt in Rhino3D

The trick is :
Sweeping the cross section of the thread along 2 curves, two concentric spirals with the pitch of the thread.


This is a quick and dirty tutorial for making a 3D threaded bolt in Rhino 3D. Once you have made your own 3D thread scaling, cutting and pasting will give you all other sizes.

The bolt head dimensions are avalaible on the internet, I have added two pictures to this blog to spare you searching for basic info on thread and head dimensions.

Making the basic bolt cilinder and head are considered basic Rhino3D skills so goor luck!
One suggestion is to work very precise, type in de dimensions and you grid snap where possible.


The most difficult part for me was making the thread.
Following the below basic steps you will be able to replicate the M10 thread.
I drew a M10 bolt and the dimensions mentioned in the tutorial are for an M10 with fine thread which has a 1.25mm pitch.

1. Draw the thread very precisely.
You can use the dimensions from the figures at the end of this tutorial.


2. I place this thread and the helper lines on the side of the M10 bolt shaft cilinder.


3. The spiral curve is drawn, with its axis along the cilinder axis of the bolt with a diameter of 10mm and a pitch of 1.25mm.


4. This spiral is copied and transformed by scaling it 2D in the "circular" plane. Resulting in a 8.2mm diameter spiral. (with naturally a 1.25mm pitch also)


5. The thread will be made by creating a surface by sweeping the thread along these two spirals. The thread will have to be split to size, see the drawing below. I use the two squares to do that very precise. It is this selected curve that will be swept along the two spirals.


6. Once you made your spiral surface/thread all that is left, is cutting off the front and capping it.
Cutting the start of the thread and connecting it to the bolt cilinder.


The "official" thread dimensions:


Enjoy making it,

The trick is : 
sweeping the cross section of the thread along 2 curves, the two concentric spirals withe the pitch of the thread.